Here you will learn how to link pages, add tables, lists and even comments to your Web page.
<a href="webpages/something.html" rel="nofollow" target="_blank" >Something</a>
This code will display the text "Something" in a underlined blue font. If you want to change the color of visited and active link, then you have to use the following attribute with the <body> tag:-
<body alink="purple" vlink="red">
<a href="https://www.facebook.com/">Facebook.com</a>
<a name="section name">My section</a>
<a href="#section name" rel="nofollow" target="_blank" >Link to My section of this web page</a>
<a href="WEBADDRESSNAME.html#section name">Link to the My section of ck web page</a>
Here is an example:
<a href="http://google.com" rel="nofollow" target="_blank" ><img src="path of the image"></a>
So, any click on this image will redirect the web browser to google.com
<table><tr><td>xxxxxxxxxxxx</td><td>xxxxxxxxxxxxx</td></tr>
<tr><td>xxxxxxxxxxxxxx</td><td>xxxxxxxxxxxxxxxxxxx</td></tr>
</table>
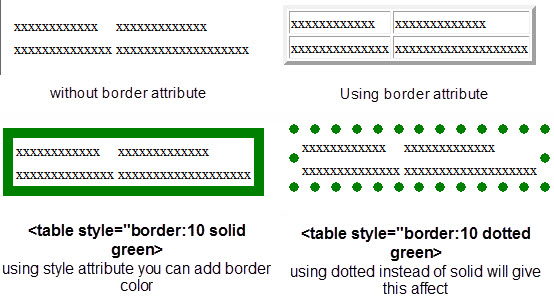
If you will use "border" attribute then assign it some value then the table will be displayed with borders but if you will not use "border" attribute, the the table will have no border.You can also assign different colors to border.
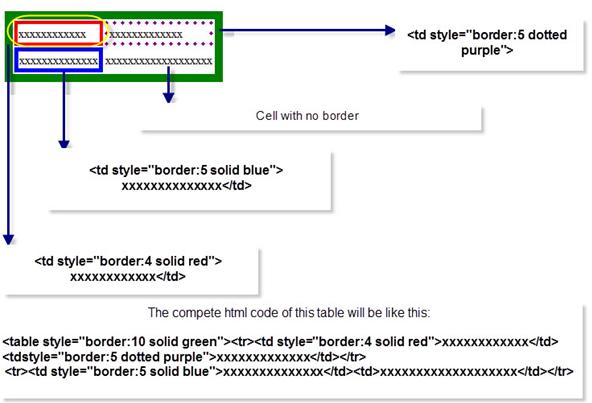
If you want to give different border size and color to each cell, then separately use "style" attribute with <td> tag.
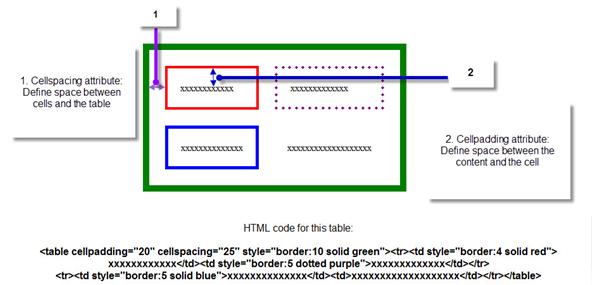
Cellpadding is an attribute of <table> tag. By using cellpadding attribute you can set the amount of space between the contents of the cell and the cell wall.
Ex:- <table cellpadding="4">
Cellspacing is also an attribute of <table> tag. By using cellspacing attribute you can set the amount of space between the table cells.
Ex:- <table cellspacing="4">
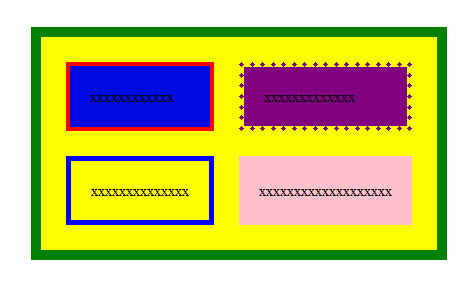
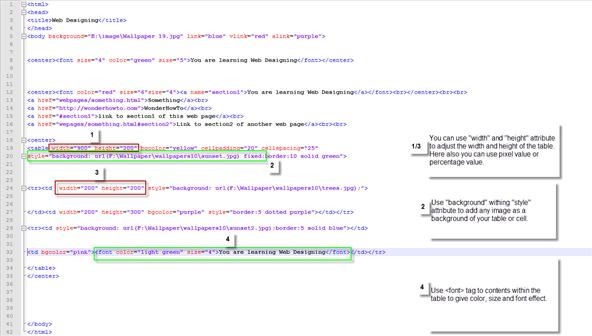
You can background color to your table and cells simply by using "bgcolor" attribute.
<center><table bgcolor="yellow" cellpadding="20" cellspacing="25" style="border:10 solid green">
<tr><td bgcolor="light blue" style="border:4 solid red">xxxxxxxxxxxx</td>
]<td bgcolor="purple" style="border:5 dotted purple">xxxxxxxxxxxxx</td></tr>
<tr><td style="border:5 solid blue">xxxxxxxxxxxxxx</td>
<td bgcolor="pink">xxxxxxxxxxxxxxxxxxx</td></tr>
</table>
If you think that adding colors as a background in you table is not so appealing, then no problem. You can use background attribute to add any images as background of your table or to each cell separately.
See image for more reference.
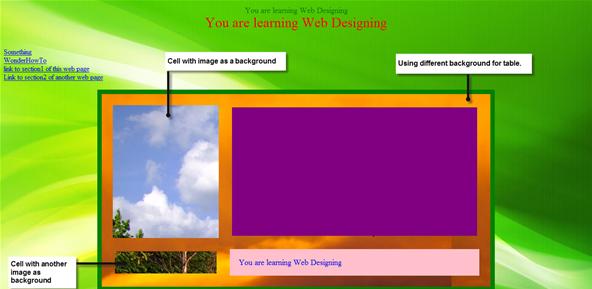
Output:-
There are three types of lists inH T M L:-
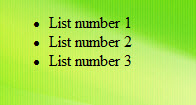
An unordered list starts with the <ul> tag and each list item starts with the <li> tag.
Example:-
<ul>
<li>List number 1</li>
<li>List number 2</li>
<li>List number 3</li>
</ul>
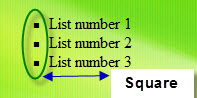
Output:- All the list items written within <li> tag will be displayed with bullets. If you want to change the shape of these bullets from circle to square then use "type" attribute.
Example:-
<ul type="square">
<li>List number 1</li>
<li>List number 2</li>
<li>List number 3</li>
</ul>
Output:- Try using "disc" value in "type" attribute!
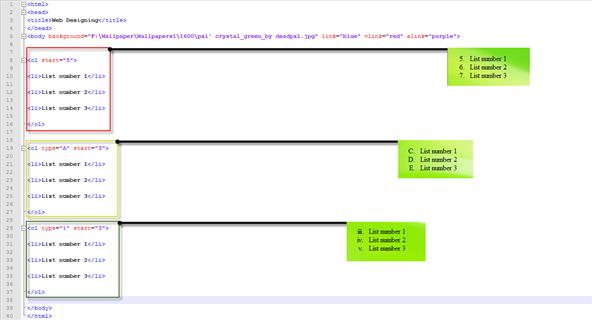
An ordered list starts with the <ol> tag and each list start with <li> tag.
Example:-
Try this tag yourself and see the effect:- <ol type="I">
Suppose you want to start your list with number 5 or any alphabet C instead of 1 or A, then try using "start" attribute.
Example:-
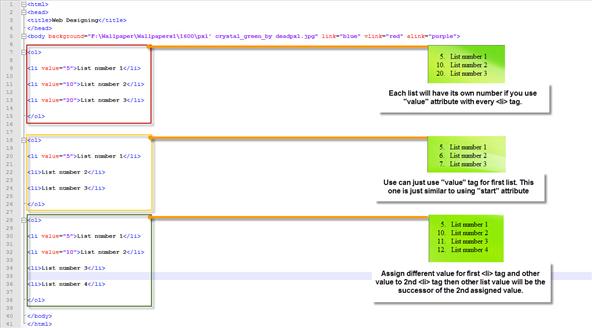
You can get the same result but by using different method. If you use "value" attribute with <li> tag then you will get the same result. But here is a twist, suppose you started your first list with number 5 but wanted to list second item with number 10, then you will use the following cod:-
<ol>
<li value="5">List number 1</li>
<li value="10">List number 2</li>
<li value="20">List number 3</li>
</ol>
See image below for more reference/Idea:-
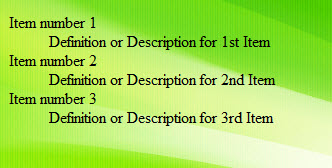
Definition list contains list of items with a description or definition of each item.
Every definition list start with <dl> tag and ends with </dl> tag.
<dt> tag which is used within the <dl> tag defines a definition list. <dd> tag which is used within <dt> tag defines the description for each list.
Example:-
<dl>
<dt>Item number 1</dt>
<dd>Definition or Description for 1st Item</dd>
<dt>Item number 2</dt>
<dd>Definition or Description for 2nd Item</dd>
<dt>Item number 3</dt>
<dd>Definition or Description for 3rd Item</dd>
</dl>
Output:-
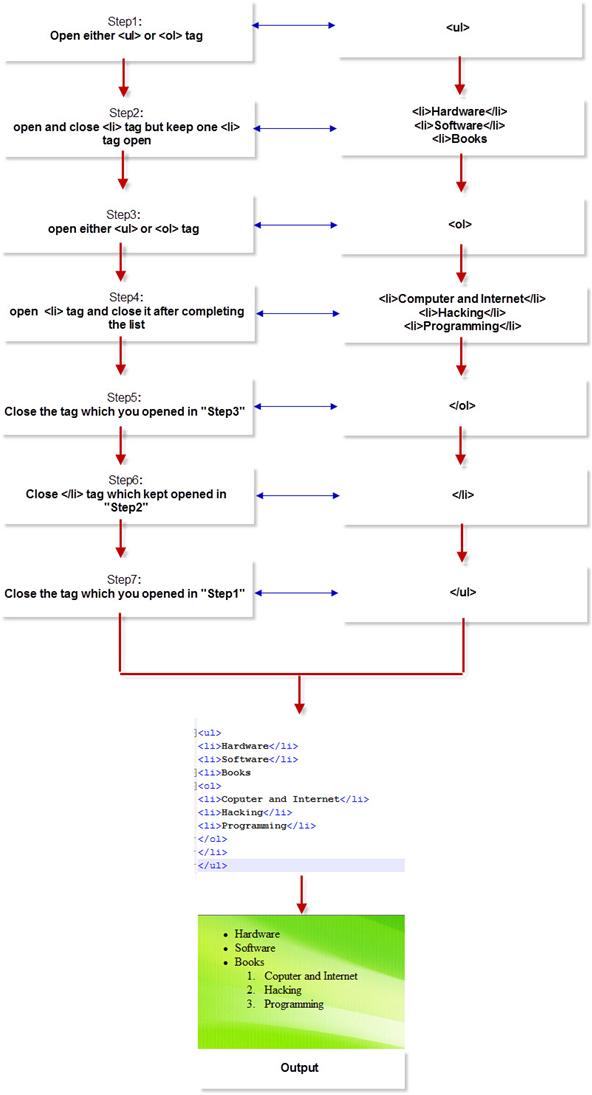
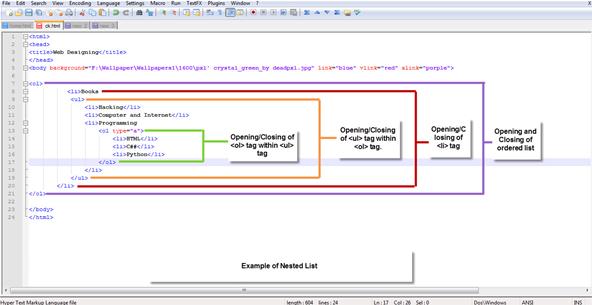
Nested list is not any new type of list but a combined use to unordered list and ordered list.
Here is an example of Nested list:-
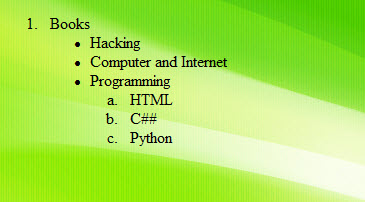
Output:-
If you are still confused about how to create Nested list then Following the instructions below:-
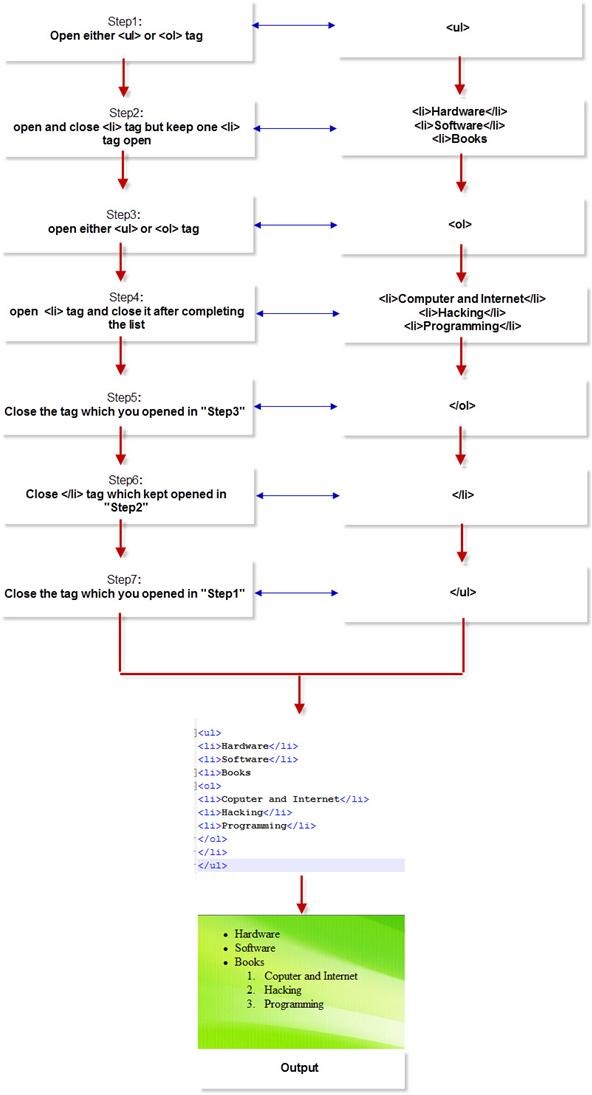
Hope this helps you!
The comment tag is used to add comments to your H T M L code or source code. Contents within these tags are not displayed by the browser. Comment tag is just used to keep you H T M L code confusion free or add description if youR Web Page has very complex source code. Adding comment tag helps you when you edit the code for updating your web page.
Example of Comment tag:-
<!--Text within these tags are not displayed by the Web Browser-->
Now go to page 6 to learn step 5.
|
|
How Many People Visit |
|